Installing on OSX Mavericks, Yosemite
This guide was written for OSX 10.9 (Mavericks) but was tested with Yosemite.
This guide requires some basic familiarity with:
- Entering commands in OSX. This is done with the “Terminal” application found under Utilities in your Applications folder.
- Using the text editor Vim (Engadget quick start guide), but you can replace
vimwith your installed editor of choice, such asvi,emacsornano.
Many of the commands contain USERNAME. You’ll need to replace this with your Mac OSX user name, which is different than the display name on the login screen. You can find your user name by entering the command:
whoami
Contents
- Install MySQL
- Enable Apache
- Considerations
- Permissions
- Enabling .htaccess files
- Choosing a URL and file location scheme
- Option 1: Set up user configuration file to use “Sites” folder work flow
- Option 2: Set up virtual hosts
- Installing required Perl modules
- Prerequisites
- Install Perlbrew
- Make OSX Perl path match standard Linux Perl path
- Install libjpeg and libpng
- Install Perl modules
- Install Movable Type
- Optional: Enable PHP
Install MySQL
Download MySQL for free at the MySQL downloads page. Find the latest appropriate DMG file for your system and click the “Download” button. Most OSX users with a newer system should choose “Mac OS X 10.9 (x86, 64-bit), DMG Archive”.
The next screen may ask for more information, but you can scroll down and click “No thanks, just start my download.”.
Then double click the downloaded DMG file to mount it, and its contents should open in a new window.
Double click the mysql-5.6.21-osx10.8-x86_64.pkg file (unclear why this is not “10.9,” but it should work) and follow the prompts.
Note: You may get an error message like:
“mysql-5.6.16-osx10.7-x86_64.pkg” can't be opened because it is from an unidentified developer.
Your security preferences allow installation of only apps from the Mac App Store and identified developers.
In this case, open System Preferences, click Security & Privacy, and under the General tab, under “Allow apps downloaded from:”, select “Anywhere”. You may also need to click the lock icon at the lower left and enter your password before doing this. Then try running the PKG file again.
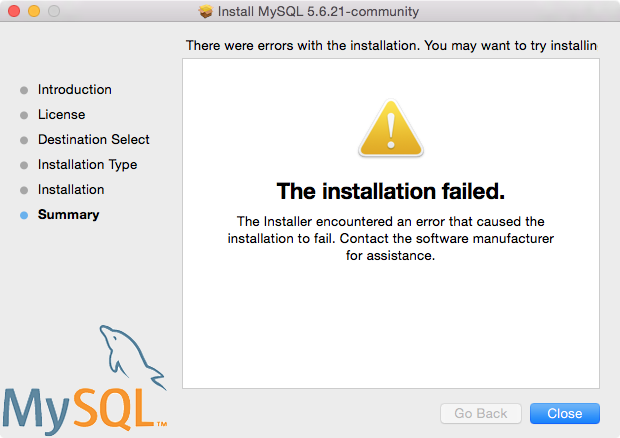
NOTE: On Yosemite, you may get this error:
Others noted this is apparently due to the “Startup Item” installation failing. The rest of MySQL will still work fine, so you can ignore the error. To avoid it in the first place, you could do a custom installation and uncheck the “Startup Item” box.
This may not be necessary on Yosemite: Next, install the preference pane by double clicking “MySQL.prefPane” and following the prompts. There is a check box if you want MySQL to start automatically, in which case you also must install the MySQLStartupItem.pkg file. Otherwise you’ll need to visit the MySQL preferences section under System Preferences each time you want to use it.
To allow us to install the Perl module DBD::mysql later, we also need to run this command (or see two alternative options under “Installing DBD::mysql” in Installing Perl, DBD::mysql and Ensembl on OSX):
sudo ln -s /usr/local/mysql/lib/libmysqlclient.18.dylib /usr/lib/libmysqlclient.18.dylib
More information
See the “ReadMe.txt” file for notes on upgrading existing MySQL installations and more. It also contains information about the file structure:
The Mac OS X PKG of MySQL installs itself into
/usr/local/mysql-VERSIONand also installs a symbolic link,/usr/local/mysql, that points to the new location. If a directory named/usr/local/mysqlexists, it is renamed to/usr/local/mysql.bakfirst. Additionally, the installer creates the grant tables in themysqldatabase by executingmysql_install_db.The MySQL socket file is created as
/tmp/mysql.sockby default.
Optional: Add MySQL to path
So you can use commands like mysql, mysqladmin and mysqldump on your command line without needing to prepend /usr/local/mysql/bin/, you can add the MySQL binaries directory to the OSX path variable.
Enter the following command:
echo "export PATH=/usr/local/mysql/bin:\$PATH" >> ~/.bash_profile
After you quit and reopen Terminal, entering the command echo $PATH should yield the mysql directory prepended to others. If not, see this Super User question for more ideas on modifying the OSX path.
Optional: Set MySQL root password
Enter one of these commands to set your root password:
Have system prompt for password:
/usr/local/mysql/bin/mysqladmin -u root passwordEmbed password in command (this will store the password in your
.bash_historyfile!):/usr/local/mysql/bin/mysqladmin -u root password 'p@s$w0rd'
Now you can connect to your database with the command:
/usr/local/mysql/bin/mysql -u root -p
p@s$w0rd
Enable Apache
sudo apachectl start
Note: Prior to Mountain Lion (10.8), there was an option for this in “Web Sharing in System Prefrences” under “Sharing”
Now you should be able to browse to http://localhost and get Apache’s defualt “It works!” page, which is located at /Library/WebServer/Documents/index.html.en.
Apache should automatically start after reboots, but if you find it does not, enter this command:
sudo launchctl load -w /System/Library/LaunchDaemons/org.apache.httpd.plist
Considerations
Permissions
By default, Apache in OSX runs as the low privilege user _www. The directories containing your files you want to view through the local web server will need appropriate permissions such that the Apache user can read the files and directories. Often this requires adding read and execute permissions to all directories up through the parent directory of the web root. If the permissions are not sufficient, you will see a “403 Forbidden” error when trying to view a locally hosted page in your browser.
One heavy handed but easy way to solve this is to assign 755 permissions to all the web files. If your web root is ~/Documents/Web Projects, you could execute the command:
chmod -R 755 ~/Documents/
If you do not want to deal with permissions, as a last resort it should be possible to make Apache run as the root user by changing these lines in /private/etc/apache2/httpd.conf:
User root
Group wheel
This is not recommended.
Enabling .htaccess files
If you want .htaccess files to function locally, Apache’s AllowOverride directive needs to be set to something other than “None” for the configuration affecting the relevant directories. To make this global, you could edit /etc/apache2/httpd.conf to change AllowOverride None to AllowOverride All and restart Apache. It would be better to put this in your user configuration files, USERNAME.conf or httpd-vhosts.conf, as shown in the following sections.
Choosing a URL and file location scheme
The web root, the base directory Apache uses to serve files, which corresponds to http://localhost/, is by default /Library/WebServer/Documents/.
Note: In previous versions of OSX, enabling Web Sharing in System Preferences created a folder called
Sitesin the user folder. The~/Sitesfolder was removed from the default OSX installation in Lion, version 10.7, but users who upgraded from previous versions might still have it.
You can choose to store your web files within the Sites folder (Option 1 below) or anywhere else, such as ~/Documents/Projects. If you want to assign custom domain names to your local sites and access them with local URLs like http://local.example.com, skip to Option 2 below.
Option 1: Set up user configuration file to use “Sites” folder work flow
The default OSX Apache configuration looks for additional configuration files at /etc/apache2/users, so first check if you have one already:
ls /etc/apache2/users/USERNAME.conf
If nothing is returned, create the file:
sudo vim /etc/apache2/users/USERNAME.conf
Then enter the following:
<Directory "/Users/*/Sites/">
    Options Indexes MultiViews
    # Disable .htaccess files with AllowOverride None
    # AllowOverride None
    # Enable .htaccess files with AllowOverride All
    AllowOverride All
    Order allow,deny
    Allow from all
</Directory>
You could replace the * with your user name, though it should work like this.
Then restart Apache with sudo apachectl restart.
Now http://localhost/~USERNAME/ should correlate with /Users/USERNAME/Sites/. If loading that URL shows a “403 Forbidden” error, you might not have a Sites folder:
mkdir ~/Sites
echo "This is ~/Sites/index.html" > ~/Sites/index.html
Option 2: Set up virtual hosts
From the Apache documentation:
The term Virtual Host refers to the practice of running more than one web site (such as company1.example.com and company2.example.com) on a single machine.
You can use this technique in combination with a “hosts file” modification to create custom local URLs to access your development sites. First we we’ll modify Apache’s main configuration file to make Apache look for the virtual hosts configuration file.
Enter this command:
sudo vim /etc/apache2/httpd.conf
On Yosemite, also uncomment this line by removing the #:
#LoadModule cgi_module libexec/apache2/mod_cgi.so
On Mavericks and Yosemite, uncomment this line, which is toward the bottom of the file, by removing the #:
#Include /private/etc/apache2/extra/httpd-vhosts.conf
Back up that configuration file and then create a new one.
cd /private/etc/apache2/extra/
sudo mv httpd-vhosts.conf httpd-vhosts.conf-original
sudo vim httpd-vhosts.conf
Insert something like this, replacing “USERNAME”:
NameVirtualHost *:80
<VirtualHost *:80>
  DocumentRoot "/Users/USERNAME/Documents/"
  ServerName localhost
</VirtualHost>
<Directory />
  Allow from all
  # Disable .htaccess files with AllowOverride None
  # AllowOverride None
  # Enable .htaccess files with AllowOverride All
  AllowOverride All
</Directory>
<Directory ~ "/cgi-bin">
  Allow from all
  SetHandler cgi-script
  Options +ExecCGI
</Directory>
<Directory ~ "/mt-static">
  Allow from all
  SetHandler None
  Options -Indexes -ExecCGI
</Directory>
Note: Yosemite ships with Apache 2.4, which requires some syntax changes. Replace the
Allow from alllines above withRequire all granted.
This will create a virtual host called localhost, but you could either change that name or add additional VirtualHost blocks with other pairs of ServerName and DocumentRoot.
<VirtualHost *:80>
  DocumentRoot "/Users/USERNAME/Documents/Projects/example.com"
  ServerName local.example.com
</VirtualHost>
<VirtualHost *:80>
  DocumentRoot "/Users/USERNAME/Documents/Projects/example.net"
  ServerName local.example.net
</VirtualHost>
The Directory blocks with cgi and mt-static will come into play a bit later when we configure Movable Type.
If you want to keep http://localhost pointing to /Library/WebServer/Documents/, replace the VirtualHost block above with:
<VirtualHost *:80>
  ServerName localhost
  DocumentRoot /Library/WebServer/Documents/
</VirtualHost>
Then restart Apache with sudo apachectl restart.
Hosts modifications
In order to access http://local.example.com and http://local.example.net, you need to edit your hosts file.
sudo vim /etc/hosts
Add the following line to the bottom:
127.0.0.1 local.example.com local.example.net
You could also do these on separate lines to make commenting them out easier:
127.0.0.1       local.example.com
127.0.0.1       local.example.net
After saving, you might as well run this command to clear the local DNS cache:
dscacheutil -flushcache
Now you should be able to access http://local.example.com and http://local.example.net locally.
Installing required Perl modules
Here we are basically following “Installing Perl, DBD::mysql and Ensembl on OSX.”
Prerequisites
OSX should automatically install GCC, and you should have Xcode installed. Run the command gcc -v and see if you get output like:
Configured with: --prefix=/Applications/Xcode.app/Contents/Developer/usr --with-gxx-include-dir=/Applications/Xcode.app/Contents/Developer/Platforms/MacOSX.platform/Developer/SDKs/MacOSX10.9.sdk/usr/include/c++/4.2.1
Apple LLVM version 5.0 (clang-500.2.79) (based on LLVM 3.3svn)
Target: x86_64-apple-darwin13.0.2
Thread model: posix
or
Using built-in specs.
Target: i686-apple-darwin11
Configured with: /private/var/tmp/llvmgcc42/llvmgcc42-2336.11~182/src/configure --disable-checking --enable-werror --prefix=/Applications/Xcode.app/Contents/Developer/usr/llvm-gcc-4.2 --mandir=/share/man --enable-languages=c,objc,c++,obj-c++ --program-prefix=llvm- --program-transform-name=/^[cg][^.-]*$/s/$/-4.2/ --with-slibdir=/usr/lib --build=i686-apple-darwin11 --enable-llvm=/private/var/tmp/llvmgcc42/llvmgcc42-2336.11~182/dst-llvmCore/Developer/usr/local --program-prefix=i686-apple-darwin11- --host=x86_64-apple-darwin11 --target=i686-apple-darwin11 --with-gxx-include-dir=/usr/include/c++/4.2.1
Thread model: posix
gcc version 4.2.1 (Based on Apple Inc. build 5658) (LLVM build 2336.11.00)
If you don’t have Xcode installed yet, you should see this:
xcode-select: note: no developer tools were found at '/Applications/Xcode.app', requesting install. Choose an option in the dialog to download the command line developer tools.
And then you should get a dialog box:
The “gcc” command requires the command line developer tools. Would you like to install the tools now?
Choose “Install” and “Agree”. Then, running gcc -v again, you should get:
Configured with: --prefix=/Library/Developer/CommandLineTools/usr --with-gxx-include-dir=/usr/include/c++/4.2.1
Apple LLVM version 5.1 (clang-503.0.38) (based on LLVM 3.4svn)
Target: x86_64-apple-darwin13.1.0
Thread model: posix
If not, you can find information on installing command line tools in OSX (versions older than Mavericks) on this Stack Overflow answer.
Install Perlbrew
Using OSX’s default Perl installation can be problematic and upgrading OSX can break modifications. It’s best to install a new version of Perl. We can also choose Perl 5.14, which is better tested with Movable Type, as opposed to OSX Mavericks’s default Perl 5.16.
To install Perlbrew:
curl -L http://install.perlbrew.pl | bash
echo 'source $HOME/perl5/perlbrew/etc/bashrc' >> ~/.bash_profile
Now exit and reopen Terminal to be sure the path gets updated so you can run the following commands, the first of which takes 5–10 minutes:
perlbrew install --notest --as 5.14.4 --thread --64all -Duseshrplib perl-5.14.4
perlbrew install-cpanm
This isn’t strictly necessary since MT’s CGI files specify the Perl path in the shebang line, but if you’d like perl on command line to point to your intended Perl installation, run this command:
perlbrew switch 5.14.4
Make OSX Perl path match standard Linux Perl path
The Perl installation we want to use is located within your user directory, but Movable Type’s CGI files each independently point to the standard Linux Perl location, /usr/bin/perl. We don’t need that Perl anymore on OSX, so we can simply make that location link to our new Perl installation. If you prefer to keep the existing /usr/bin/perl as is, you can manually edit the shebang line of each CGI file later. For simplicity, we’ll do the first option:
cd /usr/bin
sudo mv perl perl.old
sudo ln -s /Users/cgorichanaz/perl5/perlbrew/perls/5.14.4/bin/perl perl
Install libjpeg and libpng
These libraries are required for Movable Type to be able to generate thumbnails of JPEG and PNG images, and must be installed before installing the Imager Perl module.
A quick way to accomplish this is downloading and running this package from Ethan Tira-Thompson. (Note: This is a third party website, and while the package worked for us, proceed at your own risk. You may wish to install libjpeg and libpng from source. )
Install Perl modules
cpanm DBI
# May need the following for running test suites
cpanm Test::Differences Test::Exception Test::Perl::Critic
cpanm DBD::mysql
# install optional modules for enhanced MT functionality
cpanm HTML::Entities Archive::Zip IPC::Run Crypt::DSA Crypt::SSLeay XML::Parser XML::Atom Mail::Sendmail Net::SMTP::TLS Net::SMTP::SSL Imager
Install Movable Type
Set up database
Movable Type needs a database to store templates, entries and other data. Since this is a local development installation, we could just use the root MySQL user and password we set up earlier, but for good practice, we’ll set up a dedicated MT user.
First, log into the MySQL console with the command mysql -uroot -p. Enter your root password you set earlier, such as p@s$w0rd. Then you should arrive at a mysql> prompt. Enter these commands:
create user 'mt'@'localhost' identified by 'p@s$w0rd';
create database `mt-5.2.9` CHARACTER SET utf8 COLLATE utf8_general_ci;
grant all on `mt-5.2.9`.* to 'mt'@'localhost';
exit;
Download Movable Type
You can purchase Movable Type software from http://movabletype.com. For this guide, we will assume you already have Movable Type saved as the file MT-6.x.x.zip.
The following commands assume you set up Apache earlier to correlate http://localhost with /Users/USERNAME/Documents/:
mkdir -p ~/Documents/example.com/cgi-bin
cd ~/Documents/example.com/cgi-bin
mv ~/Downloads/MT-6.x.x.zip .
unzip MT-6.x.x.zip
rm -f MT-6.x.x.zip
ln -sn MT-6.x.x mt
# the .cgi files in mt should already be set to executable
chmod -R 777 mt/mt-static/support
Configure Movable Type
cd mt
cp -a mt-config.cgi-original mt-config.cgi
sed -e 's/www.example.com/localhost/g' -e 's|/cgi-bin/mt/|/example.com/cgi-bin/mt/|' -e 's|/mt-static|/example.com/cgi-bin/mt/mt-static|' -e 's/DATABASE_NAME/mt-6.x.x/g' -e 's/DATABASE_USERNAME/mt/' -e 's/DATABASE_PASSWORD/p@s$w0rd/g' mt-config.cgi-original > mt-config.cgi
echo "BaseSitePath /Users/cgorichanaz/Documents/example.com" >> mt-config.cgi
echo "ImageDriver Imager" >> mt-config.cgi
# web server needs to write to BaseSitePath
# could also do sudo chmod 777 since this is local dev
sudo chown _www /Users/cgorichanaz/Documents/example.com
Run installation wizard
Now you should be able to visit http://localhost/example.com/cgi-bin/mt/mt-check.cgi to see if you are missing any Perl modules you need. If it looks OK and the bottom says “Movable Type System Check Successful,” you can continue to http://localhost/example.com/cgi-bin/mt/mt.cgi to run the installation wizard.
Once you log in, the only change you’ll need to make due to the setup described in this guide is to confirm the publishing paths are correct within your first “website” in Movable Type. Go to Settings -> General, and under Publishing Paths, set the Website URL to http://localhost/example.com/. This should correspond to the actual file location listed next to Website Root.
Optional: Enable PHP
Developing static sites with Movable Type does not require PHP, but if you want to use PHP in your templates, you’ll need to enable PHP in the Apache configuration. Enter this command:
sudo vim /etc/apache2/httpd.conf
Uncomment this line:
#LoadModule php5_module libexec/apache2/libphp5.so
Then restart Apache with sudo apachectl restart.
If PHP files don’t load correctly
OSX should have a file /etc/apache2/other/php5.conf telling Apache to process PHP files with the PHP parser. If that file is missing, you can add this to httpd.conf:
<IfModule php5_module>
    AddType application/x-httpd-php .php
    AddType application/x-httpd-php-source .phps
    <IfModule dir_module>
        DirectoryIndex index.html index.php
    </IfModule>
</IfModule>
Customizing PHP
A fresh OSX installation will not have a PHP configuration file at /private/etc/php.ini, so you can create one from the defaults by entering the command:
sudo cp -a /private/etc/php.ini.default /private/etc/php.ini
Connect PHP to MySQL
By default, PHP looks for the MySQL socket file, which it needs to interact with MySQL server, at /var/mysql/mysql.sock, but MySQL for OSX creates the file at /tmp/mysql.sock. A quick solution is to create a symlink:
sudo mkdir -p /var/mysql
cd /var/mysql
sudo ln -s /tmp/mysql.sock mysql.sock
michael webster on April 27, 2014, 11:51 a.m. 返信
Ok, I get up to
ggc.Everything seems fine.
But something is wrong with the
.bash_profle.And perl won’t load.
I get this error.
Charlie Gorichanaz on April 30, 2014, 11:30 a.m. 返信
Hi Michael. Troubleshooting this could obviously be complicated.
which perlto see what your system thinks Perl’s path is?Cheesemaster64 on October 14, 2014, 7:17 p.m. 返信
Thank you for such clear documentation. I really missed the “Sites” folder for users and this showed me how to get them back.
Is there any where to automatically generate the “/etc/apache2/users/USERNAME.conf” for new users when they are created? Basically, I am using my server for a school who’s students will be different every year, so it would be nice for a quick way to make new users.