Sharing Template Modules Between a Website and its Blogs
This chapter explains how to share common template modules and widgets between a parent website and its child blogs. We will use the "Classic" theme for websites and blogs as examples.

Common Template Modules
For a website and blog to display a unified design, you need to have them share the following template modules:
- Website Data
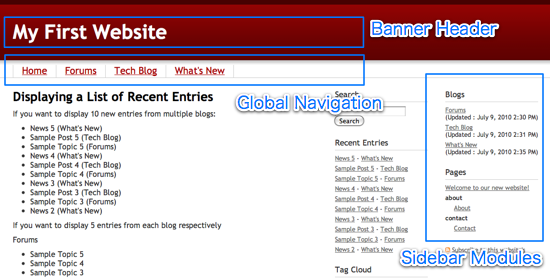
- Banner Header
- Global Navigation
Optionally, you can also share:
- A "Sidebar" module
- Widget modules
Creating a "Website Data" module
In many cases you might want to use website settings and information on a blog. A handy way to accomplish this is to create a template module called "Website Data" at the website level which contains following details:
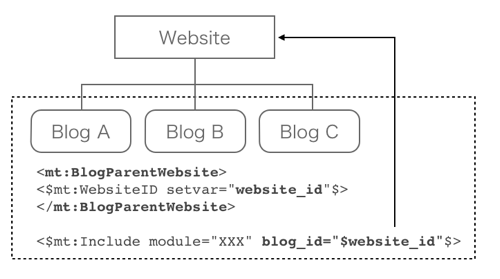
<mt:BlogParentWebsite>
<mt:SetVars>
website_name=<$mt:WebsiteName$>
website_description=<$mt:WebsiteDescription$>
website_url=<$mt:WebsiteURL$>
</mt:SetVars>
</mt:BlogParentWebsite>
Then include this "Website Data" template module in following templates at the website level:
- Index Templates
- Main Index
- Archive Templates
- Page
- System Templates
- Comment Preview
- Comment Response
- Search Results
You can do this by pasting the snippet below into the head of each template:
<$mt:Include module="Website Data"$>
Next, include the "Website Data" template module in the following templates of the child blogs of the website:
- Index Templates
- Main Index
- Archive Templates
- Category Entry Listing
- Entry
- Monthly Entry Listing
- Page
- System Templates
- Comment Preview
- Comment Response
- Search Results
This is done by pasting the snippet below into the head of each template:
<mt:BlogParentWebsite>
  <$mt:WebsiteID setvar="website_id"$>
</mt:BlogParentWebsite>
<$mt:Include module="Website Data" blog_id="$website_id"$>
This way the website settings are stored as variables in each website and blog template, giving you an easy way to access them.
Creating a common "Banner Header" template module
We will use a common "Banner Header" template module for a website and blog, yet have different content displayed for each. Use the <mt:IfWebsite> and <mt:IfBlog> conditional tags to switch the displayed content. If included on a website, the "banner header" template module will display content enclosed in the <mt:IfWebsite> tag. If included on a blog, it will display content enclosed in the <mt:IfBlog> tag. Template tags related to <mt:Website> cannot be used on a blog. Therefore, we will use the "Website Data" template module variables to display the website settings.

<div id="header">
  <div id="header-inner">
    <div id="header-content">
<mt:IfWebsite>
  <mt:If name="main_index">
      <h1 id="header-name"><a href="<$mt:WebsiteURL$>"><$mt:WebsiteName$></a></h1>
      <h2 id="header-description"><$mt:WebsiteDescription$></h2>
  <mt:Else>
      <div id="header-name"><a href="<$mt:WebsiteURL$>"><$mt:WebsiteName$></a></div>
      <div id="header-description"><$mt:WebsiteDescription$></div>
  </mt:If>
</mt:IfWebsite>
<mt:IfBlog>
  <mt:If name="main_index">
      <h1 id="header-name"><a href="<$mt:BlogURL$>"><$mt:BlogName$></a> - <a href="<$mt:GetVar name="website_url"$>"><$mt:GetVar name="website_name"$></a></h1>
      <h2 id="header-description"><$mt:BlogDescription$></h2>
  <mt:Else>
      <div id="header-name"><a href="<$mt:BlogURL$>"><$mt:BlogName$></a> - <a href="<$mt:GetVar name="website_url"$>"><$mt:GetVar name="website_name"$></a></div>
      <div id="header-description"><$mt:BlogDescription$></div>
  </mt:If>
</mt:IfBlog>
    </div>
  </div>
</div>
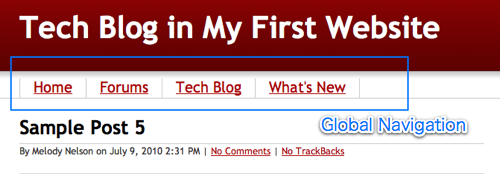
Save the content above at website level as the "Banner Header" template module, and then include it on the blog template like below.
<$mt:Include module="Banner Header" blog_id="$website_id"$>
Creating a common "Global Navigation" template module
This template code will display a list of the child blogs which can be used for global navigation. Clicking "home" links back to the website's top page, and clicking a blog name links to the main page of that blog.
<mt:BlogParentWebsite>
<div id="gnavi">
  <div id="gnavi-inner">
    <div id="gnavi-content">
      <ul class="pkg">
        <li><a href="<$mt:GetVar name="website_url"$>">Home</a></li>
<mt:Blogs include_blogs="children">
        <li<mt:If name="__last__"> class="last"</mt:If>><a href="<$mt:BlogURL$>"><$mt:BlogName$></a></li>
</mt:Blogs>
      </ul>
    </div>
  </div>
</div>
</mt:BlogParentWebsite>
Use the <mt:BlogParentWebsite> tag to toggle the website context on. The <mt:Blogs> tag displays a list of blogs in the website. Use the <,mt:If name="last"> and add a class="last" attribute to the end of the list if you want to have a special design for that element applied via CSS. Paste the following CSS to your "stylesheet" template to see this in action.
#gnavi {
    border-bottom : 1px solid #cccccc;
}
#gnavi-inner {
    padding: 0;
    position: relative;
    width: 940px;
    margin: 0 auto;
}
#gnavi-inner ul {
    margin-left : 0;
    margin-bottom : 0;
    padding : 0 20px;
}
#gnavi-inner ul li {
    float : left;
    list-style-type : none;
    padding : 0 15px 3px;
    border-left : 1px solid #cccccc;
    font-size : 125%;
}
#gnavi-inner ul li.last {
    border-right : 1px  solid #cccccc;
}
Creating a common "Sidebar" template module
The widget set displayed in a blog sidebar can be switched to behave differently on a blog and on the parent website (just like the "Global Navigation" module we talked about earlier). In the following example, widget sets created on the website switch their display depending on the location where the "sidebar" template module is included.
<div id="beta">
  <div id="beta-inner">
<mt:IfWebsite>
    <$mt:WidgetSet name="Sidebar1 for Website"$>
</mt:IfWebsite>
<mt:IfBlog>
    <$mt:WidgetSet name="Sidebar1 for Blog" blog_id="$website_id"$>
</mt:IfBlog>
  </div>
</div>

<div id="gamma">
  <div id="gamma-inner">
<mt:IfWebsite>
  <mt:If name="main_index">
    <$mt:WidgetSet name="Sidebar2 for Website Main Index"$>
   <mt:Else>
    <$mt:WidgetSet name="Sidebar2 for Website Other"$>
   </mt:If>
</mt:IfWebsite>
<mt:IfBlog>
  <mt:If name="main_index">
    <$mt:WidgetSet name="Sidebar2 for Blog Main Index" blog_id="$website_id"$>
  <mt:Else>
    <$mt:WidgetSet name="Sidebar2 for Blog Other" blog_id="$website_id"$>
  </mt:If>
</mt:IfBlog>
  </div>
</div>
Creating a common widget module
It is also possible to create a common widget used on both the blog and the website which will always show the same content. For example: the following widget will display a list of the web pages in the website no matter if it is used on the blog or on the website level. Because it is enclosed in the <mt:BlogParentWebsite> tag, it will always display the contents as seen in website context.
<mt:BlogParentWebsite>
  <div class="widget">
    <h3 class="widget-header">Web pages</h3>
    <div class="widget-content">
       <ul>
      <mt:Pages no_folder="1">
         <li><a href="<$mt:PagePermalink$>"><$mt:PageTitle$></a></li>
      </mt:Pages>
      <mt:Folders>
        <li><strong><$mt:FolderLabel$></strong>
        <ul>
        <mt:Pages>
          <li><a href="<$mt:PagePermalink$>"><$mt:PageTitle$></a></li>
        </mt:Pages>
        </ul>
        </li>
      </mt:Folders>
      </ul>
    </div>
  </div>
</mt:BlogParentWebsite>
Including common template modules in a website
Let's include the common template modules created in the above examples in each website template. For example, modify the "main index" template as below.
<$mt:Include module="Website Data"$>
<!DOCTYPE html PUBLIC "-//W3C//DTD XHTML 1.0 Transitional//EN"
  "http://www.w3.org/TR/xhtml1/DTD/xhtml1-transitional.dtd">

......

   <div id="container">
    <div id="container-inner">

<$mt:Include module="Banner Header"$>
<$mt:Include module="Global Navigation"$>

      <div id="content">
        <div id="content-inner">
.....
Including common template modules in a blog
When using common template modules in every blog template, we need to indicate the parent website ID in the "blog_id" attribute of the <mt:include> tag.
<mt:BlogParentWebsite>
  <$mt:WebsiteID setvar="website_id"$>
</mt:BlogParentWebsite>
<$mt:Include module="Website Data" blog_id="$website_id"$>
<!DOCTYPE html PUBLIC "-//W3C//DTD XHTML 1.0 Transitional//EN"
  "http://www.w3.org/TR/xhtml1/DTD/xhtml1-transitional.dtd">
<html xmlns="http://www.w3.org/1999/xhtml" id="sixapart-standard">
<head>
  <meta http-equiv="Content-Type" content="text/html; charset=<$mt:PublishCharset$>" />
  <meta name="generator" content="<$mt:ProductName version="1"$>" />

  <link rel="stylesheet" href="<$mt:GetVar name="website_url"$>styles.css" type="text/css" />

  <link rel="start" href="<$mt:BlogURL$>" title="Home" />
  <link rel="alternate" type="application/atom+xml" title="Recent Entries" href="<$mt:Link template="feed_recent"$>" />
  <script type="text/javascript" src="<$mt:Link template="javascript"$>"></script>
  <$mt:CCLicenseRDF$>

  <title><$mt:BlogName$></title>
</head>
<body id="classic-website" class="mt-main-index layout-wtt">
  <div id="container">
    <div id="container-inner">

<$mt:Include module="Banner Header" blog_id="$website_id"$>
<$mt:Include module="Global Navigation" blog_id="$website_id"$>

      <div id="content">
        <div id="content-inner">
.....
In this example, the following template modules are included from the website level.
- Website Data
- styles.css
- Banner Header
- Global Navigation
In this way, we can share common template modules between the blog and website, and this helps greatly in managing portal sites consisting of multiple blogs.
Rebuild triggers settings
Rebuild triggers for index templates of websites
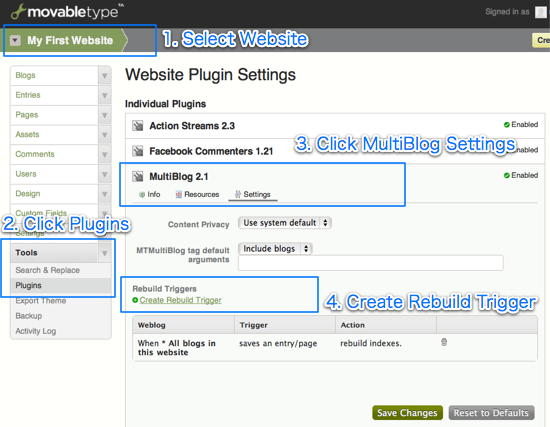
Using the MultiBlog plugin, rebuild triggers allow website index templates to be rebuilt whenever a child blog is updated. To set a rebuild trigger:
- Select [Website] in the navigation
- Select [Tools] > [Plugins] in the side menu
- Select "MultiBlog 2.x" from the plugin list, and click "Create Rebuild Trigger" link.
You can create a rebuild trigger by combining any of the following options:
- When
- all websites and blogs in this system
- all blogs in this website
- the selected blog
- do/does
- save an entry/page
- publish and entry/page
- publish a comment
- publish a trackback
- then
- rebuild indexes
- rebuild indexes and send pings
Rebuild triggers can be set up for blogs as well as websites. It is also possible to rebuild the index templates of one blog when another blog is updated.
Rebuild triggers and including content from common templates in archive templates
You can rebuild index templates with rebuild triggers, but not any other type of template.
However, if you need to update parts of your archive templates as well, there is a workaround which involves using SSI (Server Side Includes).
Create the parts that would need an update, such as "recent entries", as index templates and then include the output files resulting from these templates in archive templates via SSI.
Why do I get an error when I try to change my blog's theme to "professional blog"?
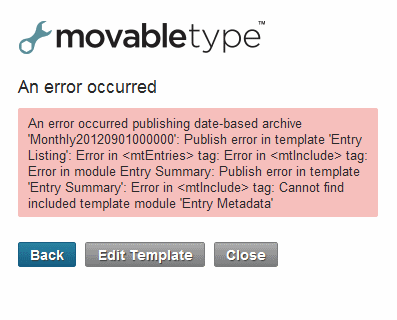
If you want to set the "professional blog" as the current theme for your blog, you need to make sure the theme for the website associated with that blog is set to "professional site."
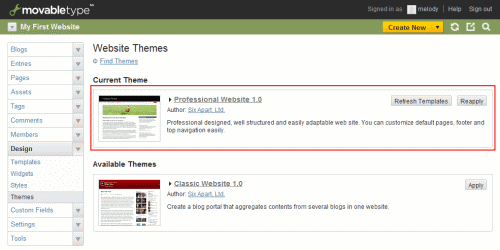
- First, select "host website" from the navigation pull down menu on the management screen.
- Click on "theme" under "design" from the side menu.
- From the list of available themes, click the "use" button next to "professional website 1.0" and then click "rebuild".
Acknowledgment
This document was originally written and contributed by Hajime Fujimoto, translated by Six Apart, and edited by Maarten Schenk.