Dashboard Changes
Along with the addition of the [Site Stats] widget and Message Center, the “This is you” widget has moved to a new location.
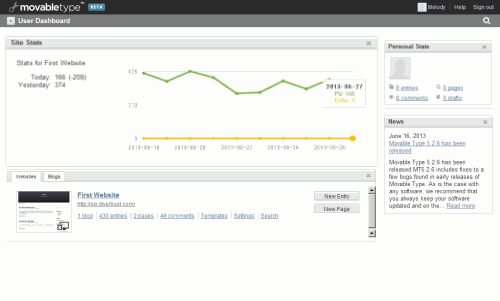
Addition of the [Site Stats] widget
[Blog Stats] widget has been replaced by the new [Site Stats] widget.
Linking to Google Analytics
By linking with Google Analytics, website and blog access statistics are analyzed and then displayed in an easy to read graph on the user dashboard.
* [Blog Stats] will be displayed if the config directive [EnableBlogStats] is set to 1.
Message Center
The message center is located near the top of the user dashboard will be used from now on as the main hub for displaying alerts, such as notifications of plugin and application updates, security warnings and system messages.
“This is you” widget relocation
The [This is you] widget has been moved to the top right of the screen.
Linking to Google Analytics
By linking a Movable Type account to a Google Analytics user profile, a graph showing website and blog access statistics will be generated and displayed in the [Site Stats] widget on the dashboard.
The OAuth2 application is required to use the Google API. For more information on OAuth2 and the Google API, please refer to “Google API Console Help”.
The following is a step by step guide to setting up the Google API.
<li>From the left-hand menu, click on <strong>[Settings]</strong> and then <strong>[Web Services]</strong>.
<li>Click the <strong>[Google APIs Console]</strong> link to move to the Google page. This link should be displayed in the <strong>[Google Analytics]</strong> settings column.</li>


<span class="picture"><img alt="Google Analytics configuration" src="http://www.movabletype.org/beta/60/images/ga_1_en.png" width="500" height="218" class="mt-image-none"  /></span>

<li> From the right-hand <strong>[Google APIs]</strong> menu, choose <strong>[API Access]</strong>.
<li>Click <strong>[Create an OAuth 2.0 Client ID]</strong> from the API Access page.</li>

<span class="picture"><img alt="Create an OAuth Client ID" src="http://www.movabletype.org/beta/60/images/ga_2.png" width="500" height="306" class="mt-image-none" /></span>

<li>The "Create Client ID" pop-up window should appear. Type in and confirm the following information.

<ul>
  <li><em>Product Name</em>: The name of the product</li>
  <li><em>Google Account</em>: The name of the linked Google account</li>
  <li><em>Product Logo</em>: The inclusion of a product logo is optional. Type in the image URL to generate a thumbnail of the logo.</li>
  <li><em>Home Page URL</em>: The MT blog or website URL</li>
</ul>

Click "next" to continue.
</li>

<span class="picture"><img alt="Create Client ID" src="http://www.movabletype.org/beta/60/images/ga_3.png" width="500" height="290" class="mt-image-none" /></span>

<li>On the last page, the following client ID settings needs to be selected and confirmed:

<ul>
    <li><em>Application Type</em>: Select the type of web application you want to use</li>
    <li><em>Your site or hostname</em>: The URL for the site that has Movable Type 6 installed with be displayed here. You can edit this information later.</li>
</ul>
Once the necessary information is entered, click "Create Client ID".
</li>

<span class="picture"><img alt="Client ID Settings" src="http://www.movabletype.org/beta/60/images/ga_4.png" width="500" height="291" class="mt-image-none" /></span>

<li>A Client ID will be created based on the previously entered information.</li>


<li>Confirm that the "Redirect URIs" displayed on the screen are correct. If the URIs differ from the URIs displayed on the Movable Type set-up screen, click  "Edit settings", located in the right-hand menu, to make any necessary corrections.</li>

<span class="picture"><img alt="Redirect URIs" src="http://www.movabletype.org/beta/60/images/ga_6.png" width="500" height="134" class="mt-image-none" /></span>

<li>Confirm the "Authorized Redirect URIs" is exactly the same as the "Redirect URI of the OAuth2 application" URI located on the Movable Type set-up screen.</li>

<span class="picture"><img alt="Edit client Settings" src="http://www.movabletype.org/beta/60/images/ga_7.png" width="500" height="343" class="mt-image-none" /></span>

<li>Enter the automatically generated "Client ID" and "Client Secret" on the Movable Type admin screen.</li>

<span class="picture"><img alt="Client ID and Client Secret" src="http://www.movabletype.org/beta/60/images/ga_8.png" width="500" height="251" class="mt-image-none" /></span>

<li>Click "Select Google Analytics profile" located in Settings. A pop up window will appear, displaying the Google user access authorization screen (or account selection screen). </li>

<span class="picture"><img alt="popup" src="http://www.movabletype.org/beta/60/images/ga_9_en.png" width="500" height="354" class="mt-image-none" /></span>

<li>Select "Allow Access" from the user access authorization screen and the pop-up screen should close. The profile selection screen should now be displayed in the CMS modal window.
<span class="picture"><img alt="profile" src="http://www.movabletype.org/beta/60/images/ga_10.png" width="500" height="403" class="mt-image-none" /></span>

<li>From the overview screen, select a profile and then click "OK". The Google Analytics profile for the selected user should be displayed.</li>


<li> Click "Save Changes" to save all changes.</li>

<li>If the set-up process was completed successfully, the Google Analytics access data should now be displayed in a graph on the dashboard.</li>
<span class="picture"><img alt="access graph" src="http://www.movabletype.org/beta/60/images/ga_11_en.png" width="500" height="306" class="mt-image-none" /></span>
(Information displayed is recent as of June 2013. The Google screen display as well as API set-up method may change without prior notice.)
* This function is powered by the “Chart API”. For more information on this new API, please refer to the link below:
* Please note that the information on this page, as well as the product description, are subject to change without prior notice following the product release date.