Professional Website
The Professional Website Template Set, formerly known as the “Universal Template Set” or “UTS,” is a complete web site design using Movable Type’s template set and theming infrastructure. The concepts behind the templates are:
- to make it easy for users to create not just a blog, but an entire web site — complete with an About and Contact page, and more.
- to produce a professional and clean, well designed web site
- to build a set of templates that is more intuitive and easy to customize, with simpler HTML and CSS than the default templates.
- to create a set of “smart templates” that allows authors with very few technical skills to modify the behavior of the web site.
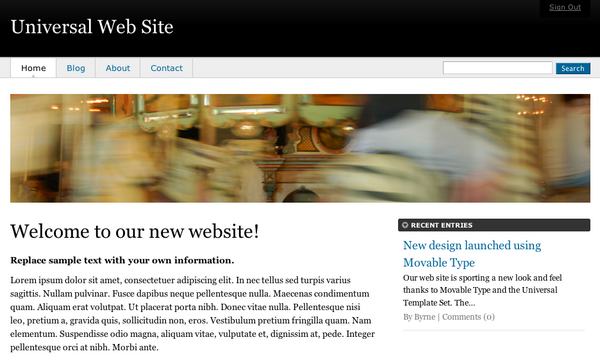
The following is a screenshot of a default Universal Template Set, the header of which has been customized.
Features
The Professional Website Template Set will:
- produce a professional designed, well structured and easily adaptable web site
- automatically install place holder pages for your web site so that right out the box you can see what your future web site will look like
- make it easy to customize default pages and other content on your web site by providing an “Edit this Page” link right there on the published web site
- allow authors to easily customize the pages that appear in both the footer and top navigation
Instructions
Installing the Professional Website Template Set
The Professional Website Template Set (PWTS) can be installed on any Movable Type powered blog. To create a new PWTS web site, click on blog selector pull down menu and click “Create Blog.” On the subsequent screen you will be prompted for the name of your blog and the template set you wish to use. Select “Professional Website” and click Continue.
To install the PWTS web site over an existing blog, navigate to the Templates section listed under the Design menu. Select “Refresh templates” under the Actions section of the page. A dialog will appear, select “Apply new template set” and then select “Professional Website” from the menu. Press the continue button.
Once the templates have been installed click the publish button and in a few moments Movable Type will have published our new web site and you can view it.
Selecting one of the bundled PWTS style
Movable Type Pro comes bundled with four different styles that can be applied to a PWTS powered web site. To change your style, navigate to Style Catcher under the Design Menu.
If you do not see the Style Catcher menu item listed under Design, then it is probable that the Style Catcher plugin has been disabled. Navigate to Plugins under the System Overview menu, and enable the Style Catcher plugin.
From there select “PWTS Library” and select one of the four designed presented.
Customizing the CSS
The best way to customize the PWTS is by customizing its stylesheet. CSS is the preferred method of customization because it allows you to more easily keep your base CSS and HTML up to date with the latest versions of the Universal Template Set as they are released.
To edit your CSS, visit the Templates area listed under the Design menu. Edit the index template named “Stylesheet”. Its contents are simple and should contain two CSS @import statements. Add any customizations after those two important statements. Do not edit the base stylesheet or the theme stylesheet directly, as it will make it more difficult to upgrade those templates in the future.
Customizing the header image
To customize the header image, create or select an image that is 905x197 and upload it to your server. Then add this CSS to your stylesheet:
#homepage-image { background-image: url(http://path/to/your/image.jpg) !important; }
Adding new items found in the top horizontal nav
Any Movable Type Page that contains the tag “@topnav” will automatically appear in your site’s top horizontal navigation bar. To remove an item from the top nav bar, remove the tag “@topnav” from the page.
Adding new items found in the footer
Any Movable Type Page that contains the tag “@footer” will automatically appear in your site’s footer at the bottom of the page. To remove an item from the footer, remove the tag “@footer” from the page..
Flagging the About page
If you already have an existing about page on your web site, and you would like the About link in the nav header to link to that page, edit your About page and add the tag “@about”. That page will now be linked to in your nav.
Flagging the Contact page
If you already have an existing contact page on your web site, and you would like the Contact link in the nav header to link to that page, edit your Contact page and add the tag “@contact”. That page will now be linked to in your nav.
Changing a Blog to use the Universal Template Set
Any blog can utilize the Universal Template Set regardless of what template set they happen to be using now. To change your blog’s template set to the PWTS, read the instructions documented with Template Sets.
Additional Styles Available for UTS


Frequently Asked Questions
Does the PWTS require the use of Custom Fields?
No, the Professional Website Template Set was designed to work without custom fields. You can however augment the PWTS by adding custom fields that you define.
Resources
- Watch a demo of the Professional Website Template Set in action
- Blog post announcing the feature
- About Template Sets
- Template Set Developer Docs
CSS Recipes
If you have customized the Professional Website Template Set in some way and would like to share your CSS recipe, please the form below.