Customizing User Profiles
Administrator’s are allowed to edit the meta data collected from users in their profile. This allows for admins to collect valuable demographic information as well as to allow users to construct fun and interesting profiles about themselves.
The ability to customize a user’s profile is a function of a larger feature set known as “Custom Fields.” If you do not find the answer to your question in this section of the documentation, you are encouraged to consult the documentation for Custom Fields.
Core Profile Fields
The Movable Type application defines a number of fields associated with a user’s profile that cannot be modified, except to say that users are free to modify the fields’ values. Those fields are:
- the username
- the user’s email address
- the user’s display name (optional)
- the user’s preferred URL (optional)
- the user’s password
- the user’s API password (optional)
Adding Additional Profile Fields
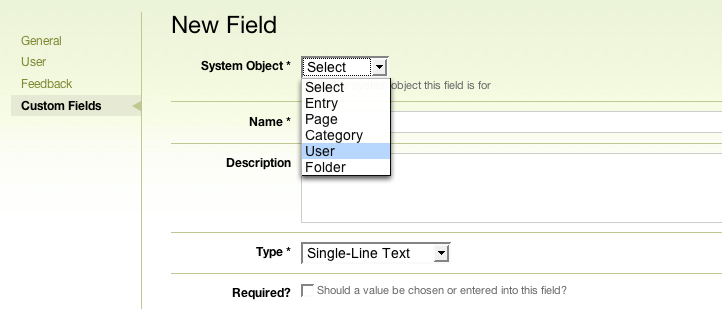
Administrators can extend the core set of fields defined by the application with their own fields by navigating to the System Overview dashboard and selecting the “Custom Fields” menu item from the Preferences menu.
From there, administrators can see a list of all the custom fields, including user fields, that have been defined within the system. They can delete, edit existing or create additional fields as they see fit.
To create an additional input for users to enter profile data, click the “New Field” link and select “User” from the System Object pull down menu.
Once a field is added, it should automatically appear to users as an editable profile field through out the application.
To learn more about the specifics of creating additional profile fields consult the documentation on Custom Fields.
Customizing the Edit Profile Form
The Edit Profile Form that is installed automatically for you when you installed the Community Solution, will automatically adapt to display all of the profile fields you have configured. In other words, if you wish to collect a user’s favorite color in their profile, then all you need to do is to define a “Favorite Color” field within the Movable Type administrative interface. The edit profile form will automatically begin displaying the “Favorite Color” field you have defined to users for them to provide you with that profile data.
It is important to note however that by editing or heavily customizing the default Edit Profile form template, you may disrupt the application’s ability to automatically generate these edit fields for you. Therefore the following documentation has been provided to help guide you in the process of customizing your Edit Profile Form.
The <form> Tag
The form used by users to submit and save their profile data in Movable Type must be directed to post its contents to a specific endpoint. To construct your edit profile form use the following HTML and Movable Type Template Tag code:
<form method="post" action="<$MTEditProfileScript$>">
  <input type="hidden" name="" value="" />
  <input type="hidden" name="" value="" />
  <!-- your form fields go here -->
</form>
To add the specific form fields that allow users to edit specific profile field values see below.
Displaying Fields
The following is an excerpt from the Edit Profile template it shows how to loop over the list of profile fields and display form elements for each field. The app:setting template tag makes the generation of the actual form field relatively straight forward.
<form name="profile" id="profile" method="post" action="<mt:var name="script_url">"
   enctype="multipart/form-data">
  <input type="hidden" name="__mode" value="save" />
  <input type="hidden" name="magic_token" value="<mt:var name="magic_token">" />
  <input type="hidden" name="return_args" value="<mt:var name="return_args" escape="html">" />
<mt:if name="id">
  <input type="hidden" name="id" value="<mt:var name="id" escape="html">" />
</mt:if>
<mt:setvarblock name="field-content">
  <span id="profile_username"><$mt:var name="name" escape="html"$></span>
  <input type="hidden" name="name" class="ti" value="<$mt:var name="name" escape="html"$>" />
</mt:setvarblock>
<MTInclude module="Form Field" id="profile_name" class="" label="User Name">
<mt:setvarblock name="field-content">
  <input name="nickname" id="nickname" class="ti"
     value="<$mt:var name="nickname" escape="html"$>" />
</mt:setvarblock>
<MTInclude module="Form Field" id="profile_nickname" class="" label="Display Name">
<mt:setvarblock name="field-content">
  <input name="email" id="email" class="ti" value="<$mt:var name="email" escape="html"$>" />
</mt:setvarblock>
<MTInclude module="Form Field" id="profile_email" class="" label="Email Address">
<mt:if name="auth_mode_mt">
  <mt:setvarblock name="field-content">
    <input type="password" name="pass" id="pass" class="pw" />
  </mt:setvarblock>
  <MTInclude module="Form Field" id="profile_pass" class="" label="Password">
  <mt:setvarblock name="field-content">
    <input type="password" name="pass_verify" id="pass_verify" class="pw" />
  </mt:setvarblock>
  <MTInclude module="Form Field" id="profile_pass_verify" class="" label="Confirm Password">
  <mt:setvarblock name="field-content">
    <input name="hint" id="hint" class="ti" value="<$mt:var name="hint" escape="html"$>" />
  </mt:setvarblock>
  <MTInclude module="Form Field" id="profile_hint" class="" label="Password Recovery">
<mt:else>
  <input type="hidden" name="external_auth" value="1" />
</mt:if>
<mt:setvarblock name="field-content">
  <input name="url" id="url" class="ti" value="<$mt:var name="url" escape="html"$>"  />
</mt:setvarblock>
<MTInclude module="Form Field" id="profile_url" class="" label="Website URL">
<mt:setvarblock name="field-content"><mt:if name="userpic"><mt:var name="userpic"></mt:if>
<input type="file" name="file" id="file" class="ti" /></mt:setvarblock>
<MTInclude module="Form Field" id="profile_userpic" class="" label="Userpic">
<mt:loop name="field_loop">
    <mt:if name="__first__">
    <input type="hidden" name="customfield_beacon" value="1" id="customfield_beacon" />
    </mt:if>
    <!-- start-customfield_<mt:var name="basename"> -->
    <mtapp:setting
        id="$field_id"
        label="$name"
        hint="$description"
        shown="$show_field"
        show_hint="$show_hint"
        required="$required">
    <mt:var name="field_html">
    </mtapp:setting>
    <!-- end-customfield_<mt:var name="basename"> -->
</mt:loop>
<div class="actions-bar actions-bar-login">
    <div class="actions-bar-inner pkg actions">
        <button
            type="submit"
            accesskey="s"
            title="Save (s)"
            class="primary-button"
            >Save</button>
    </div>
</div>
</form>
Michelle Jones on August 13, 2008, 12:50 p.m. 返信
How would you change the login template to allow new commenters on an existing blog add userpics? Custom fields doesn’t have an image upload option so I’m not really sure what the procedure is for allowing new commenters to add user pics when they register.
Byrne Reese on August 13, 2008, 2:08 p.m. 返信
If you are using Movable Type Pro then you need to add a link on your page somewhere to allow your users to edit their profile. Here are some docs that should help with that:
These two docs should take you through the process. The javascript template referred to will automatically replace a “Sign-in” link with the user’s name. Their name will be a link to edit their profile.
Presto.
DeionHarris on August 18, 2012, 11:49 p.m. 返信
I would like to link MT with https://posterous.com. However, after filling in all fields at the posterus site i get an error message. here is the message | We were not able to authenticate this account. Reason: We could not find a valid endpoint| can you help me please? thanks so much :(….. Painful experience, but ill make it. LoL.