Designing Website and Blog Themes
With Movable Type 5 we introduced a new 'website' concept. Now you can easily create a larger site by placing multiple blogs within a website. You can create multiple blogs within a website. The webmaster can manage the website's top page and other common elements, while each blogger can manage the content of an individual blog. In this section we will explain how to display blog content in a website, how to share template modules among multiple blogs, and how to link websites and blogs together.

Aggregating Website and Blog Content
You can specify the blog_id in "include_blogs" or the "blog_ids" attribute to aggregate the contents from the blogs within the website. You can use these attributes with Function Tags such as <mt:BlogEntryCount> or Block Tags such as <mt:Entries>, <mt:Categories>, <mt:Comments>, <mt:Pings>, <mt:Assets>, <mt:Tags>. The blog_id will be displayed in the CMS URL. (Example: "http://example.com/mt.cgi?__mode=dashboard&blog_id=X") If you're targeting all blogs within a website, specify include_blogs="children" or "siblings". You can also display information about the blog that each entry belongs to.

For more practical examples, let us have a look at these use cases for a website.
- Display a list of recent entries on the top page.
- Display a list of updated blogs in the sidebar.
- Display a list of recent comments in the sidebar.
1. Displaying a List of Recent Entries
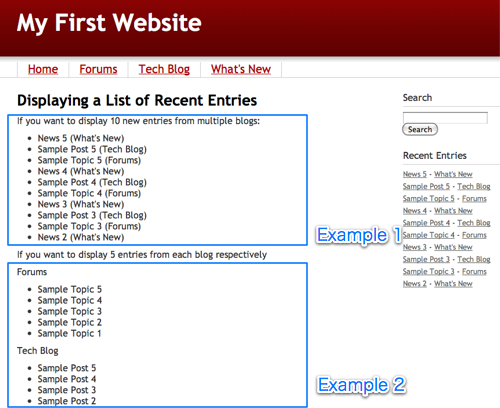
The following example displays a list of recent entries on the top page of the website. If you want to display 10 new entries from multiple blogs, use following code.
<ul>
 <mt:Entries include_blogs="children" lastn="10">
   <li><$mt:EntryTitle$>(<$mt:BlogName$>)</li>
 </mt:Entries>
</ul>
If you want to display 5 entries from each blog respectively, use this code.
<mt:Blogs include_blogs="children">
   <h3><$mt:BlogName$></h3>
   <ul>
   <mt:Entries lastn="5">
     <li><$mt:EntryTitle$></li>
   </mt:Entries>
   </ul>
</mt:Blogs>

If you want to specify only particular blogs and not all of the blogs within the website, you can directly specify the blog_id with the include_blogs attribute.
2. Displaying a List of Recently Updated Blogs in the Sidebar
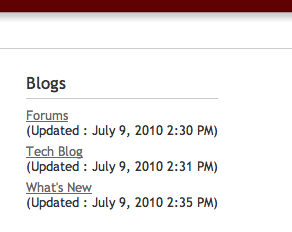
Our next example is a widget on the website which displays an overview of the blogs belonging to the website. Use the <mt:Blogs> block tag" to get information on each blog. You can also load the latest entry of each blog by specifying <mt:Entries lastn="1"> within the <mt:Blogs> tag. Our example code will also output the date and time of the entry (which is also the most recent update date and time of the blog) with the <mt:EntryDate> tag.
<div class="widget">
   <h3 class="widget-header">Blogs</h3>
   <div class="widget-content">
     <ul>
<mt:Blogs include_blogs="children">
       <li><a href="<$mt:BlogURL$>"><$mt:BlogName$></a>
       (Updated : <mt:Entries lastn="1"><$mt:EntryDate$></mt:Entries>)</li>
</mt:Blogs>
     </ul>
   </div>
</div>

You can create the widget on your own system using the following procedure.
- Select [Website] under the Navigation
- Select [Design] > [Widgets] in the Side Menu
- Click [Create widget template]
- Paste the sample code and click the [Save] button.
3. Displaying a List of Recent Comments in the Sidebar
Another example is a widget that displays the most recent comments. If you want to display the ten most recent comments from multiple blogs,you can use this code snippet.
<div class="widget-recent-comments widget">
   <h3 class="widget-header">Recent Comments</h3>
   <div class="widget-content">
     <ul>
       <mt:Comments include_blogs="children" lastn="10" sort_order="descend">
       <li><strong><$mt:CommentAuthor$>:</strong> on <mt:CommentEntry><a href="<$mt:EntryPermalink$>#comment-<$mt:CommentID$>"><$mt:EntryTitle$ (<$mt:BlogName$>)</a></mt:CommentEntry></li>
       </mt:Comments>
      </ul>
   </div>
</div>
If you want to display five comments from each blog respectively, do it like this:
<div class="widget-recent-comments widget">
   <h3 class="widget-header">Recent Comments</h3>
   <div class="widget-content">
     <ul>
     <mt:Blogs include_blogs="children">
       <li><$mt:BlogName$>
       <ul>
       <mt:Comments lastn="5" sort_order="descend">
         <li><strong><$mt:CommentAuthor$>:</strong> on <mt:CommentEntry><a href="<$mt:EntryPermalink$>#comment-<$mt:CommentID$>"><$mt:EntryTitle$></a></mt:CommentEntry></li>
       </mt:Comments>
       </ul>
       </li>
      </mt:Blogs>
      </ul>
   </div>
</div>
Excluding Specific Blogs
In Movable Type 5.1, you can use the "exclude_blogs" and the "include_blogs" attribute at the same time. You can simply say include_blogs="children" exclude_blogs="4".
<mt:Entries include_blogs="children" exclude_blogs="2,4" category="news">
  <$mt:Include module="Entry Detail"$>
</mt:Entries>
If you are still using Movable Type 5.0x, there is a method to get a limited subset of the blogs that belong to a particular website.
Use a Template Hash to Generate the List of Desired Blog ID's
Use Movable Type's templating language to first create a hash variable that contains all the Blog ID's of the blogs belonging to your website. Use the Blog ID as the Hash Key.
Next, eliminate the keys (Blog ID's) you don't want.
Finally, use the keys of this hash to construct a variable to use in the include_blogs argument.
The following example excludes the Blog ID number 4 from the website blogs.
<mt:Blogs include_blogs="children">
   <$mt:BlogID setvar="blog_id"$>
   <mt:SetVar name="website_blog_ids" key="$blog_id" value="1">
</mt:Blogs>
<mt:SetVar name="website_blog_ids" key="4" function="delete">
<mt:Loop name="website_blog_ids" glue="," setvar="include_blog_ids"><$mt:GetVar name="__key__"$></mt:Loop>
<mt:Entries include_blogs="$include_blog_ids">
YOUR CONTENTS
</mt:Entries>
Displaying Website Information on Individual Blogs
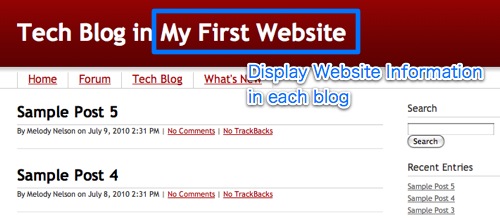
If you want to output the parent website's information within the blog template, use the <mt:BlogParentWebsite> Block tag. For example: to display the parent website's name and link on a blog this snippet of code can be used.
<mt:BlogParentWebsite>
  <a href="<$mt:WebsiteURL$>"><$mt:WebsiteName$></a>
</mt:BlogParentWebsite>


Setting Variables Containing the Website Information
If you want to use information about the website in multiple places within a template, it can be convenient to use variables. Here is a template module that sets variables for things that are often used, like "Website ID, Website Name, Description, URL".
<mt:BlogParentWebsite>
<mt:SetVars>
website_id=<$mt:WebsiteID$>
website_name=<$mt:WebsiteName$>
website_description=<$mt:WebsiteDescription$>
website_url=<$mt:WebsiteURL$>
</mt:SetVars>
</mt:BlogParentWebsite>
Save this template module as "Website Vars", and include it in each template. You can then output any website information you need with the <mt:GetVar> tag.
<$mt:Include module="Website Vars"$>
<a href="<$mt:GetVar name="website_url"$>"><$mt:GetVar name="website_name"$></a>
Displaying Information about other Blogs within the Same Website
Here is how you can display information from/about other blogs in case you have multiple blogs in the same website.
The include_blogs="siblings" attribute
With a blog template, this code snippet will display the 10 most recent blog entries from all the other blogs within the same website.
<ul>
<mt:Entries include_blogs="siblings" lastn="10">
  <li><$mt;EntryTitle$>(<$mt:BlogName$>)</li>
</mt:Entries>
</ul>
In the same way, you can display a list of recently updated blogs within the same website.
<div class="widget">
  <h3 class="widget-header">Blogs</h3>
  <div class="widget-content">
     <ul>
<mt:Blogs include_blogs="siblings">
       <li><a href="<$mt:BlogURL$>"><$mt:BlogName$></a>
       (Updated : <mt:Entries lastn="1"><$mt:EntryDate$></mt:Entries>)</li>
</mt:Blogs>
    </ul>
  </div>
</div>
Acknowledgment
This document was originally written and contributed by Hajime Fujimoto, translated by Six Apart, and edited by Maarten Schenk.
Annie on November 13, 2010, 3:35 a.m. Reply
I’m becoming a fan of Movable Type ^-^ It’s cute!